How To Set Up a Custom Domain in Blogger – The Right Way!
After writing my “Blogger vs. WordPress” post a short while ago, I was surprised to see that some people didn’t know you could set up a custom domain name on your Blogger account to make your blog your own.
You don’t have to be stuck with a “yourblogname.blogspot.com” website address, so for those of you that don’t know how to set this up, I am going to show you how! Step by step!
I realize that this looks daunting, but I promise it really isn’t, and once you set it up you won’t need to worry about it anymore.
Having your own custom domain name is one of the main things I always recommend a blogger do for various reasons:
You own it which means you can move it anywhere with you. If you decide to move off of Blogger or decide that maybe one day you’d like to change your brand/blog to something a little different, you can do that easily.
It looks much more professional and shows that you take your blog seriously.
It’s easier for others to remember.
You can set up your own email addresses using the domain name to stay consistent.
Before you do this, you will need to register a domain name. You can use any registrar you like, but I prefer GoDaddy and in this example I am going to show you how to do this using GoDaddy.
Okay, now that you’ve got your domain registered, it’s time to put it to use. I’ve outlined this the best I can so follow along with me…
Step 1:
As I said above, this example uses GoDaddy. If you don’t have your domain registered with GoDaddy, you can view steps for editing your DNS info here.
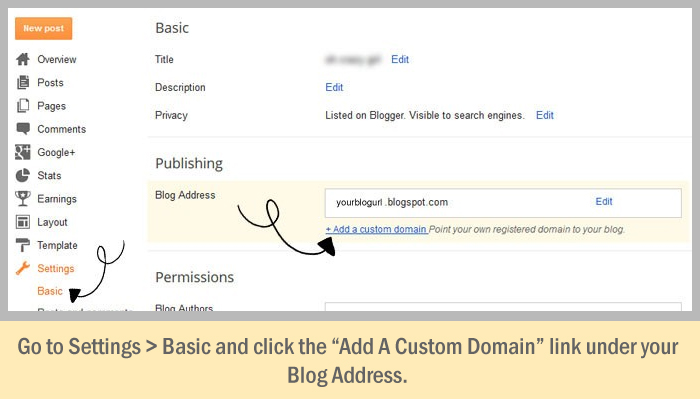
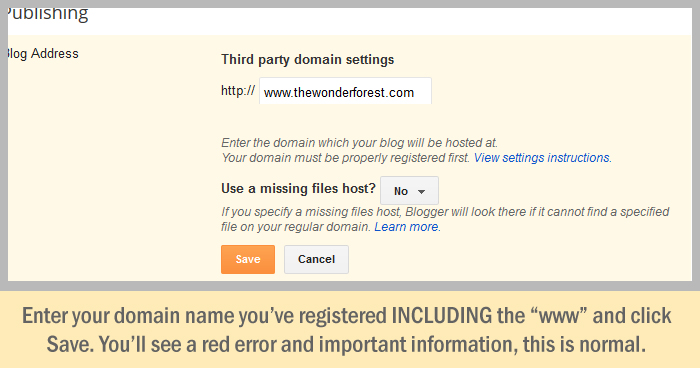
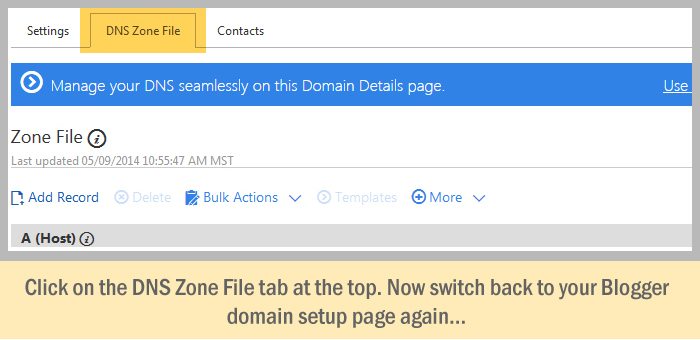
Step 2:
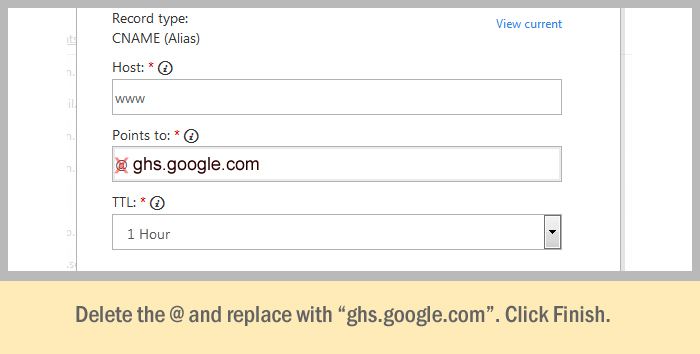
If you see the CNAME error and details as shown above, perfect, skip to step 3!
NOTE: If you’ve previously tried this and the CNAME information does not appear as above, try this:
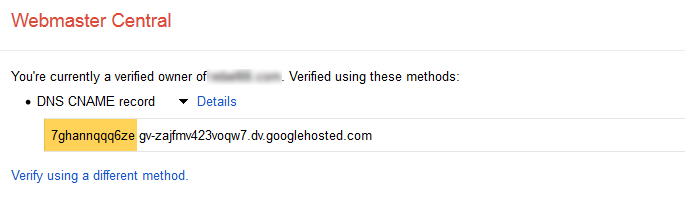
Click on “verification details” to the right of your custom URL
At the top of the page click on the DNS CNAME Details to expand the record:
The portion in yellow above is your “Host” and the portion that begins with “gv-” is your “Points To” for the step below.
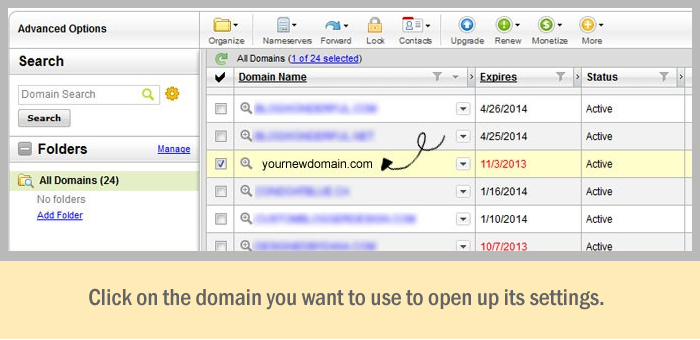
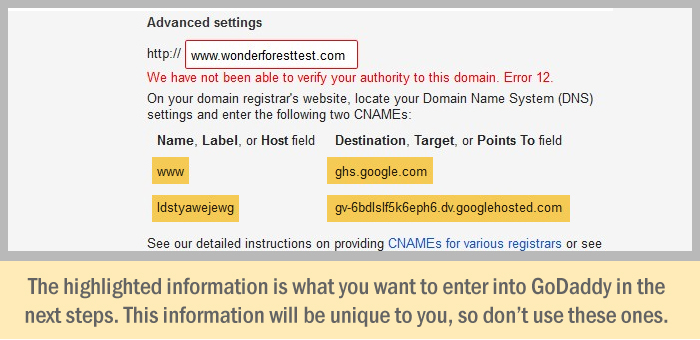
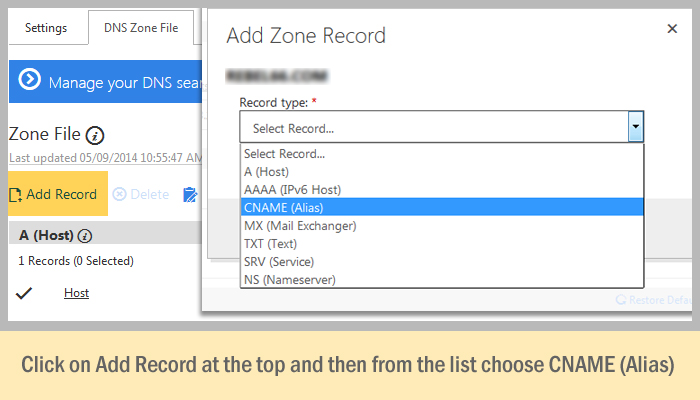
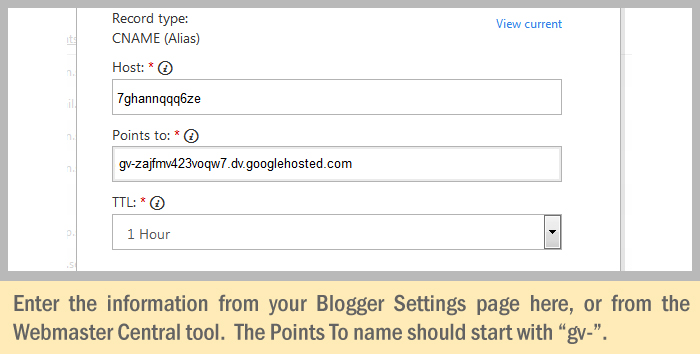
Step 3 (in GoDaddy):
* The generated codes will be unique to you, so don’t type in the ones shown above. Instead, copy the ones that Blogger generated for you.
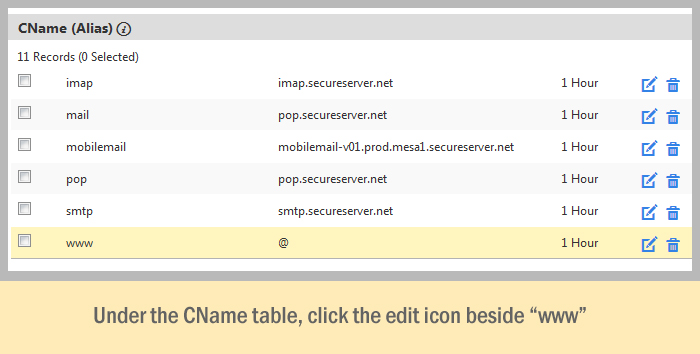
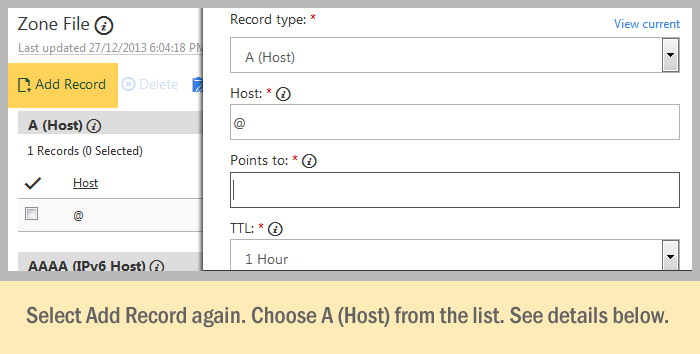
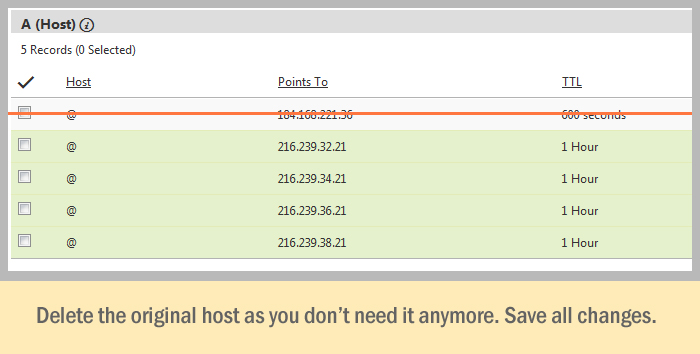
Step 4:
Now you want to add “A Records” which prevent a 404 error page from appearing if a user leaves out the “www” on your URL.
In the Host box, enter @ and in the Points To: box enter the first Google IP here: 216.239.32.21
Save it and then do the same thing three more times, adding these IP addresses: 216.239.34.21 216.239.36.21 216.239.38.21
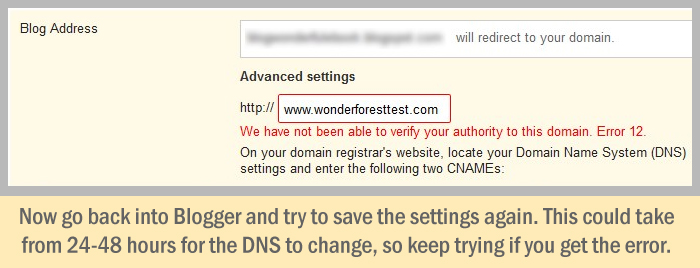
Step 5:
Remember: DNS settings can take up to 48 hours to change, which means if it’s not working right away, it’s not supposed to. Wait it out and keep checking back to see if the settings have applied. Your custom domain name should automatically direct traffic from your blogspot.com address to your new domain name.
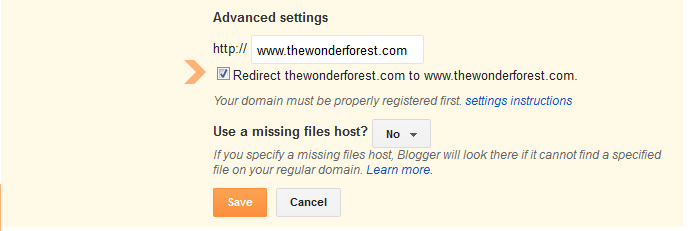
Step 6:
After your URL is set up and working, click the Edit link beside your domain name on your settings page and make sure you check the above checkbox! This will prevent errors from happening when users leave out the “www” on your url.
Enjoy your new URL! If this helped you, I’d love it if you shared it with others who might need the same help!
Q: Will this mess up my SEO? How will people find my blog if I change the URL? A: Blogger automatically redirects your old blogspot.com address to the new URL. They use what is called a 301 redirect, which means that the search engines are made aware that your site has a new URL. Traffic will continue to flow and you won’t lose any rankings.
Q: My new URL only works with/without the “www” A: Go back into your Settings page, click Edit beside your new domain name, and check the box that asks if you want to redirect the naked domain to www.
Hi Dana, thanks for this post. I didn’t know I could use my own domain until I read this. I have just bought a domain from GoDaddy and am trying to set it up but have already come to a problem on step one. Blogger doesn’t give me the option to add a domain, only to edit the one I have (which still has blogspot.com in it), add a 3rd party URL, or buy straight from Blogger. How do I do it?
I went ahead and guessed at it, assuming over the years Blogger has changed some things (GoDaddy too), and it is now up and working within seconds of publishing. Thanks Dana, for your patience and generosity in sharing this with us. http://www.ginger-peachy.com
I think Go Daddy has changed slightly since this post, though still very helpful!! Would you use the same steps to add the blog to a custom subdomain? Thanks 🙂
Dana , you are my hero. This was SO clearly written and easy to follow! I think http://www.thebettystamp.com is now finally up and running! 🙂
You’re a dreamboat. Thank you.
Betty x
You have share a very nice piece of information to set up domain name. This is a great post .It is very helpful for me. Thanks for sharing it with all. Please keep share more post because your post are unique and helpful for me. Moreover thanks again.
You are fantastic. i had associated a custom domain name over a year ago so i was a rather confident when i purchased a new one. however godaddy had made some changes and i got confused. searching the topics on godaddy and blogger articles just made everything more daunting. until i found your site and it took me less than ten minutes to implement the changes.
Thanks a million for the clear and concise information.
Hi Sir,
This is very helpful blog, I follow all the steps and get successful.
My blogspot domain was latestglobaltrends.blogspot.com and I mapped with http://onlinedrifts.com/
Thank You.
I’ve been trying to set up my account for several days but I failed. I’m glad I stumbled upon your blog! 🙂 Now my domain is ready ♥ http://www.wannderzel.com
These instructions seem really easy to follow but I already ran into a question. I just bought the domain name on GoDaddy and when I went to the first step above where your example says “Add a Custom Domain”, the following shows on my screen in that spot…
– Warning: Setting a custom domain will disable HTTPS. + Setup a 3rd party URL for your blog – Point your own registered URL to your blog.
What does this mean and how do I handle it? Thanks!
Shelley
I have done this and love it, however, when I share a particular post anywhere, the link comes up at myblog.blogspot.ca/blog/post. Is there a way to eliminate the .blogspot in the URL?
I have my own domain in blogger, but I have been told I need a hosting program like bluehost etc. to really get any monetary benefits. From what I can tell you can only do this through word press blogs but I really prefer blogger. Do you have any advice?
Thanks for the tutorial. I followed it but still getting some errors. When I visited my newly registered domain http://www.givemereport.com I got this message “This site can’t be reached. http://www.givemereport.com took too long to respond. Please what can I do?
Holy smokes! I have been struggling with this for two (count ’em) two days and it finally occurred to me to check your site. I can’t even thank you enough! Success!
Thanks for the detailed steps.
I have 1 question.
My site is working perfectly without and with www version for http version but for https version it works fine with www. And without www along with https its not working. Can you please let me know how you have implemented it for https on your site.
hi! Thanks for this post. Can we just purchase the domain with Godaddy and connect it like you did? Do you know if we will need to purchase hosting as well?
Thank you so much! I could not, for the life of me, figure out why my new domain wasn’t connecting with my blog. Followed your steps and bam,…working! I’ve used several of your tutorials. You’re a life saver for people like me who need step-by-step screen shots and instructions. Keep up the great work!..:)
But how to migrate cloudflare https to blogger https because it shows “HTTPS Availability is being processed. Check back later.” I am waiting for last three days but it is still showing the same message.
Plz help me! My blog http://en.kome.cafe don’t turn on HTTPS but my main domain https://www.kome.cafe is ok
Wonder Forest uses cookies to ensure that we give you the best experience on our website. If you continue to use this site we will assume that you are happy with it.OkPrivacy policy


Now my blogger working correctly without www and with www
http://www.pcmpedia.in
Hi Dana, thanks for this post. I didn’t know I could use my own domain until I read this. I have just bought a domain from GoDaddy and am trying to set it up but have already come to a problem on step one. Blogger doesn’t give me the option to add a domain, only to edit the one I have (which still has blogspot.com in it), add a 3rd party URL, or buy straight from Blogger. How do I do it?
I went ahead and guessed at it, assuming over the years Blogger has changed some things (GoDaddy too), and it is now up and working within seconds of publishing. Thanks Dana, for your patience and generosity in sharing this with us. http://www.ginger-peachy.com
I think Go Daddy has changed slightly since this post, though still very helpful!! Would you use the same steps to add the blog to a custom subdomain? Thanks 🙂
Dana , you are my hero. This was SO clearly written and easy to follow! I think http://www.thebettystamp.com is now finally up and running! 🙂
You’re a dreamboat. Thank you.
Betty x
The Betty Stamp
You have share a very nice piece of information to set up domain name. This is a great post .It is very helpful for me. Thanks for sharing it with all. Please keep share more post because your post are unique and helpful for me. Moreover thanks again.
Thank you thank you thank you! I now have my own domain! One question, will I have to rejig my google analytics? xx
Blog:: hanrosewilliams.co.uk
Great post! A domain name is the first step towards having a great web presence! This post rightly balances all the points described!
Awesome. I’ve been toying with setting up my own domain. Thank you for the step by step plays!!!
I had no idea! Setting it up right away. Thank you!!
Thank you so much for this! Just set everything up in less than 10 minutes 🙂 you are a gem!!
http://www.luanalune.com
You are fantastic. i had associated a custom domain name over a year ago so i was a rather confident when i purchased a new one. however godaddy had made some changes and i got confused. searching the topics on godaddy and blogger articles just made everything more daunting. until i found your site and it took me less than ten minutes to implement the changes.
Thanks a million for the clear and concise information.
Hi Sir,
This is very helpful blog, I follow all the steps and get successful.
My blogspot domain was latestglobaltrends.blogspot.com and I mapped with http://onlinedrifts.com/
Thank You.
Hi thank you so much for this blog post it was very helpful!!!!!
Thanks for this.
I’ve been trying to set up my account for several days but I failed. I’m glad I stumbled upon your blog! 🙂 Now my domain is ready ♥ http://www.wannderzel.com
This has indeed been helpful. Thanks, I appreciate. How do you enable https
Thank you so much for this – I just set everything up using this post and it was super easy!
These instructions seem really easy to follow but I already ran into a question. I just bought the domain name on GoDaddy and when I went to the first step above where your example says “Add a Custom Domain”, the following shows on my screen in that spot…
– Warning: Setting a custom domain will disable HTTPS. + Setup a 3rd party URL for your blog – Point your own registered URL to your blog.
What does this mean and how do I handle it? Thanks!
Shelley
Click on “+ Setup a 3rd party URL for your blog”, wich opens up more information and the rest is just like in this tutorial.
Thank you! This helped me a lot. Go Daddy looks a little different now because of upates, but I could still follow it. Thanks again!
how did you enable https?
You’ve saved my life twice with this post! Thank you again xx
Thanku Dana
Is this free to point to custom domain? If so it must be the only one. Now days even WordPress and Wix is not free to point to custom domain.
Thanx a lot.. i created – http://www.examselection.com
You are Marvellous.. simply awsome .
Good helping article, However Godaddy versions seems to be an old one. I see another post with latest version of screens used. This might help you tracking things quickly.
http://www.learning4earn.com/2017/09/a-guide-to-setup-custom-domain-and-nacked-domain-setup-in-blogger.html
I have done this and love it, however, when I share a particular post anywhere, the link comes up at myblog.blogspot.ca/blog/post. Is there a way to eliminate the .blogspot in the URL?
This was SOOOOO helpful!! Thank you so much!!!!
I have my own domain in blogger, but I have been told I need a hosting program like bluehost etc. to really get any monetary benefits. From what I can tell you can only do this through word press blogs but I really prefer blogger. Do you have any advice?
Oh my gosh, Dana. I literally could not have done this without your tutorial. You’re a lifesaver!
On a side note, why does my browser say “your connection on this site is not secure”? Is that a problem?
Thank you for This! i was really frustrated to set this. Thank you again
Thanks for the tutorial. I followed it but still getting some errors. When I visited my newly registered domain http://www.givemereport.com I got this message “This site can’t be reached. http://www.givemereport.com took too long to respond. Please what can I do?
Holy smokes! I have been struggling with this for two (count ’em) two days and it finally occurred to me to check your site. I can’t even thank you enough! Success!
Hello Dear,
This Article is really helpful. Thank you for sharing this great knowledge.
Buy Cheap Domain Name Hosting for your business.
Thank you.
thank you very much, that was very helpful
Thanks for the detailed steps.
I have 1 question.
My site is working perfectly without and with www version for http version but for https version it works fine with www. And without www along with https its not working. Can you please let me know how you have implemented it for https on your site.
hi! Thanks for this post. Can we just purchase the domain with Godaddy and connect it like you did? Do you know if we will need to purchase hosting as well?
Since you haven’t had an answer yet, I’ll jump in. No you don’t need hosting.
Your blog will remain hosted on blogger, you just setup your domain to direct people to it using the steps above.
Thank you so much! I could not, for the life of me, figure out why my new domain wasn’t connecting with my blog. Followed your steps and bam,…working! I’ve used several of your tutorials. You’re a life saver for people like me who need step-by-step screen shots and instructions. Keep up the great work!..:)
But how to migrate cloudflare https to blogger https because it shows “HTTPS Availability is being processed. Check back later.” I am waiting for last three days but it is still showing the same message.
Plz help me! My blog http://en.kome.cafe don’t turn on HTTPS but my main domain https://www.kome.cafe is ok