
Valentine’s Day means lots of pinks and reds and adorable decorations! We love making our own budget friendly Valentine decor, so today I wanted to show you how to create your very own felt heart garland!
You may have seen something similar to these in store, but did you know that you can create your own for a fraction of the cost?
With some cheap craft felt and thread, these felt hearts are easy to make and you can customize your garland to suit your style.
Ready to make your own Valentine’s Day garland?

You will need:
- Red and pink sheets of craft felt
- Embroidery floss and a sewing needle
- Twine for the garland string
- Red/pink felt pom poms or balls
- Polyfil or fiber fill stuffing
- Scissors
Making the felt hearts
The main element of this garland is of course the felt hearts! These hearts are really easy to make. You just need to know how to do a special stitch called the Blanket Stitch with a needle and thread.
I’ll walk you through the process step by step below so you can easily create your own heart garland.

Step 1: Cut the felt hearts

Using your scissors, cut some heart shapes out of the felt sheets. You can use a template for this and simply cut around the template as you go. You will need a front piece and a back piece for each heart. The size of the hearts is completely up to you!
Step 2: Sew the front and back together

Thread your needle with a coordinating embroidery floss and tie a knot at the end to secure it. Place the top and bottom heart pieces together. Starting at the bottom of the heart, insert your needle through the back side of the hearts and pull through to start your stitching.

For your next stitch, insert the needle back through the same hole. This will make sense in the end as we are going to attach the final stitch to this starting stitch to make it appear seamless.

Before pulling your thread all the way through the heart, insert your needle into the loop you’ve just created as shown above. It should go underneath the bottom part of the loop. Continue pulling the thread through. You’ve just created a blanket stitch!
Step 3: Continue blanket stitching

Leave an equal amount of space between your stitches as you continue this same method of inserting your needle through the loop at the end of each stitch. When you get near the end of the heart, leave a 1 inch opening.
Step 4: Stuff the heart
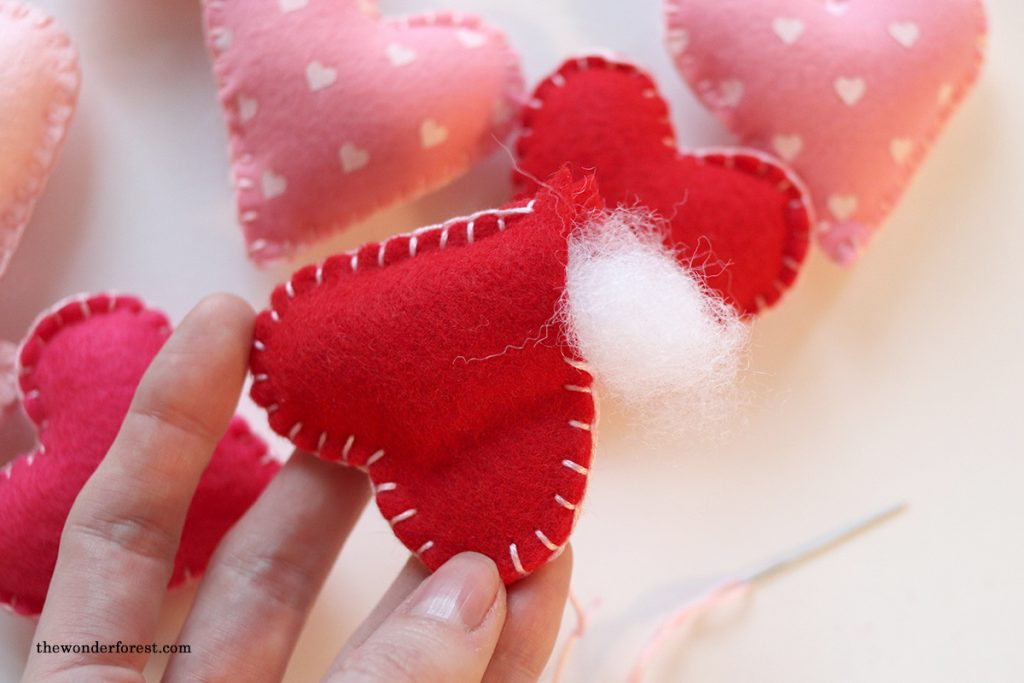
Stuff the heart with Polyfill nice and tightly. The more stuffing, the better! This will help give your hearts a firm shape.
Step 5: Finishing the round

After you’ve finished stuffing the heart, continue stitching the opening shut. When you reach the first stitch, insert your needle through the top of the thread as shown above.
You should notice that when you pull the thread through to finish the stitch, the thread from the first stitch becomes tight and looks just like the other stitches!

Now simply create a knot around the first stitch to secure it.

Hide your thread ends by inserting the needle into the side of the heart and pulling it up through the heart. Cut off the thread close to the felt and massage the felt a little to make the thread disappear inside.
Step 6: Thread hearts onto twine

Now the next step is simply threading all of your hearts and pom poms onto the twine. You can create a pattern as you do this and use your creativity! I used small balls and the hearts on a red and white twine. I spaced them evenly and was sure to leave a long enough tail on each end to be able to hang the garland.
Hang your garland wherever you wish to spread a little love this season!