
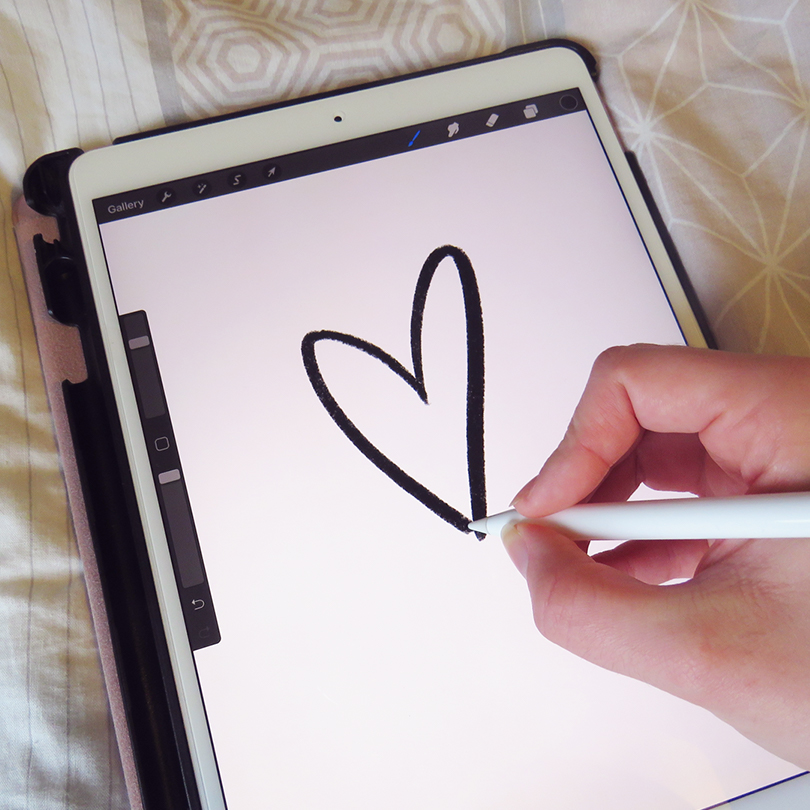
Procreate for iPad is a fantastic and affordable tool that can be used for digital artwork and animation, but it can take some getting used to if you’ve not used a similar program (like Illustrator) before.
Learning how to use Procreate as a beginner will take some time, but there are some little tips and tricks that you might not know about, that can really help you on this journey.
Small things like knowing how to draw a perfectly straight line, or how to use a clipping mask to add detail and shading to a shape, will add a new level to your Procreate artwork. You’ll be a Procreate expert creating seamless patterns in no time!
Equipment You’ll Need
The main thing you’ll need to use Procreate is an iPad, an Apple Pencil and the Procreate app. However, there are several things you might want to consider before diving in, especially as these tools are quite an expensive investment.
Remember that Procreate is only currently available on iOS, so it can only be used on Apple iPad (although a Pocket version can be used on iPhones).
For your iPad, consider what size works best for you. The huge upside of using Procreate for drawing is that you can take it anywhere with you, from the local coffee shop to the comfort of your living room sofa, so you might want to think about getting an iPad that can easily fit inside your bag.
However, for drawing, you also want a nice big screen so you can add plenty of detail to your drawings. Take a look at some of the sizes available online and find a good compromise between screen size and portability.
You’ll also need to buy an Apple Pencil for drawing. There are currently two generations of the Apple Pencil with a few subtle changes, but the main one is that the 2nd generation is able to charge wirelessly, while the original Pencil has to be plugged into the bottom of your iPad or a charger.
The 2nd generation Pencil will only work with some iPad models, so make sure you consider this when buying your iPad too.
The Procreate app is a one-off payment of $9.99 US, which gives you lifetime updates and access via your Apple account.
If you haven’t used any kind of drawing tablet before, you might also find it helpful to invest in a Paperlike screen protector, which will make drawing on your iPad feel more like drawing on paper.
File Types in Procreate
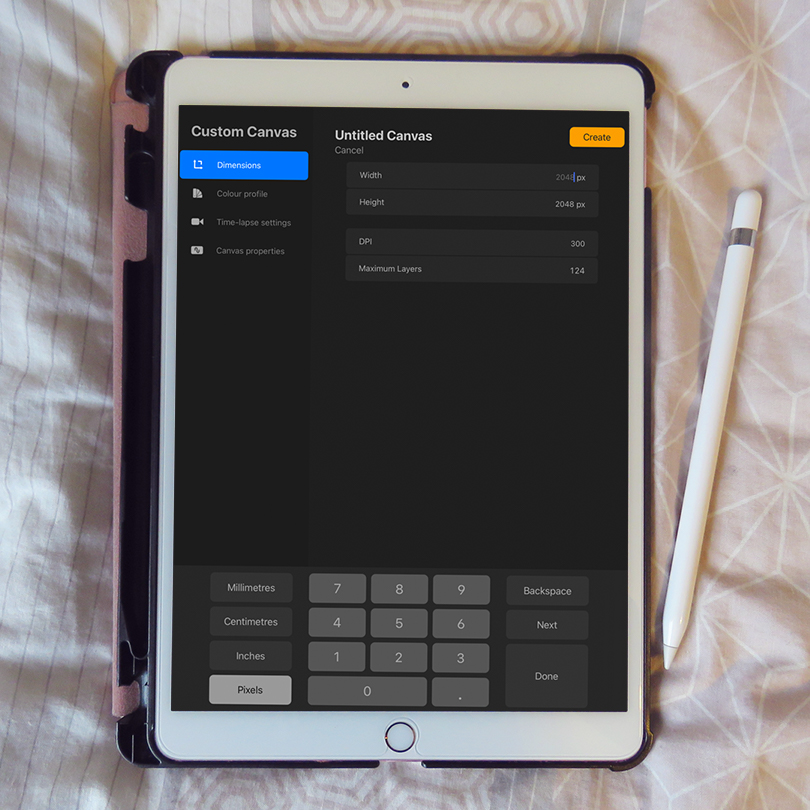
When you make a new Procreate file, you’ll be given the option to choose the size and resolution (DPI) of your canvas. You might want to choose a preset size such as A4, or you might prefer to choose a custom size.
If you want to print your artwork, you’ll want to use 300 DPI and as large a file size as possible, but be aware that this comes with limitations.
Your maximum layers will vary depending on file size and DPI, so make sure you consider this before making your canvas.
You may also want to check your colour profile. For digital artwork, RGB is perfect, but if you want to print your artwork at a later date, you might want to use CMYK, as this is the colour setting that printers use.
You can also change the options for your time-lapse video, which is a video Procreate automatically creates showing the making of each of your drawings. You can set the size and quality of the video when making a new canvas.
Turn “Touch” Off
So you’ve invested in an iPad and Pencil, you’ve downloaded Procreate, and you’re ready to go. Well, before we get creative, there is one essential step to help you make beautiful artwork in Procreate.
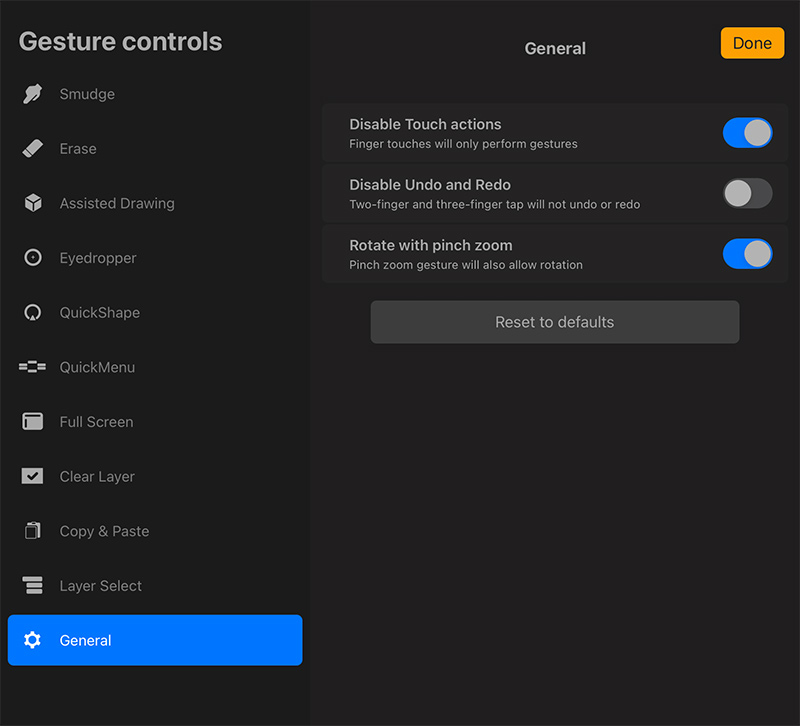
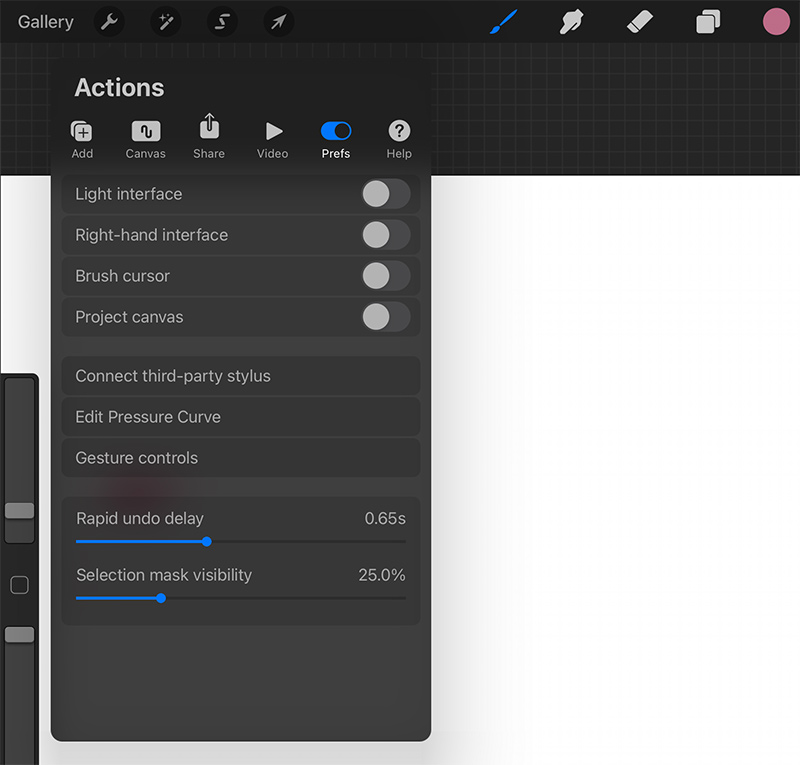
You’ll find when you open the Procreate app that you can draw with your fingers as well as your Pencil, but you’ll also notice that Procreate still recognizes the touch of your fingers when you’re using the Pencil.
You might start making strange marks with parts of your hand, and when you’re drawing, you’ll probably want to be able to lean the base of your hand on the canvas without making marks.
To turn this setting off, open a canvas and tap the wrench icon, which will open the “Actions” menu. Then go to “Preferences”, and click “Gesture controls”. Next, click “General” and “Disable touch actions”.
Procreate Basic Tools
Let’s go over some of the basic tools available to you in Procreate.
On the left, there is a bar with two sliders (this bar can also be moved to the right if you are left-handed). The top slider will change the size of your brush strokes, while the bottom slider will affect the opacity of your strokes.
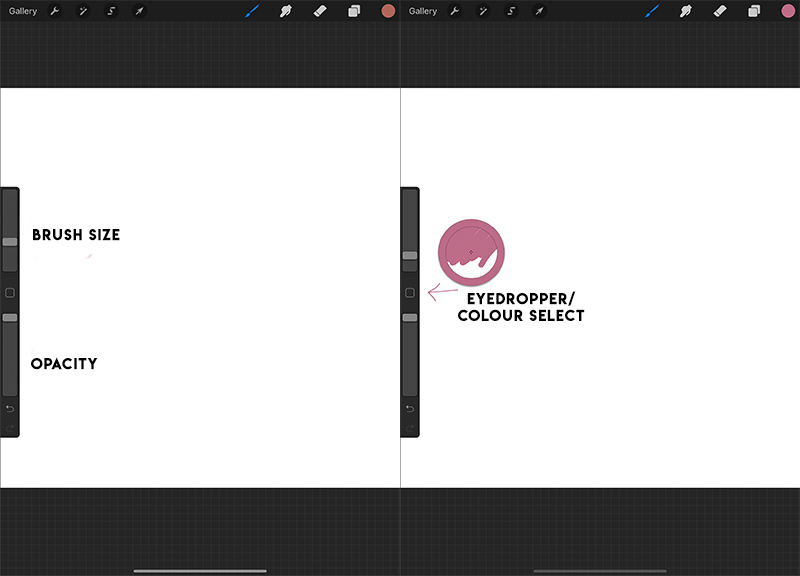
Tapping the small square in the middle will allow you to utilize the eyedropper tool, which will let you pick a colour from your canvas.
This is good for matching a colour you’ve already used in your drawing, or picking a colour from a reference picture. Beneath that, there are some “undo” and “redo” buttons.
You can press the wrench to open your “Actions” menu in which you can add an image, copy and paste, edit the size of your canvas, flip your canvas, export your image or export your Procreate process video.
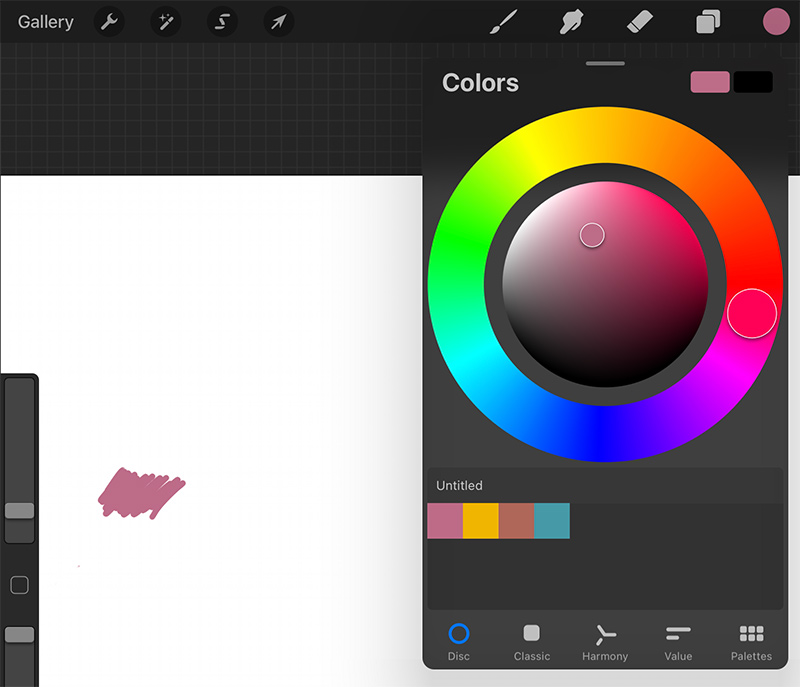
On the top right, there is another menu which includes your brush library, smudge, eraser, and layers. It also has a little circle that shows the colour you’re using. You can click this circle to edit your colour.
To fill a shape with a solid colour, first make sure that your shape is perfectly connected all the way round. Then simply drag the coloured circle in the top right into your shape and let go.
If you are using textured brushes, you may need to neaten up some of the edges manually.
You can click “Gallery” in the top left to return to the Procreate homepage.
Start Simple
Using Procreate for the first time may feel strange and unnatural, but over time you will become adjusted to this new way of drawing. However, your first drawing probably isn’t going to be a masterpiece!
While you learn how to use the app and your Pencil, the artwork you create may not be up to the standard you would expect on paper.
We recommend not putting too much pressure on yourself at first by starting simple, and going back to basics.
Why not try some life drawing, or try drawing simple shapes? This will help you gain confidence using the app and get used to the different settings.
How To Draw a Perfect Line or Circle in Procreate
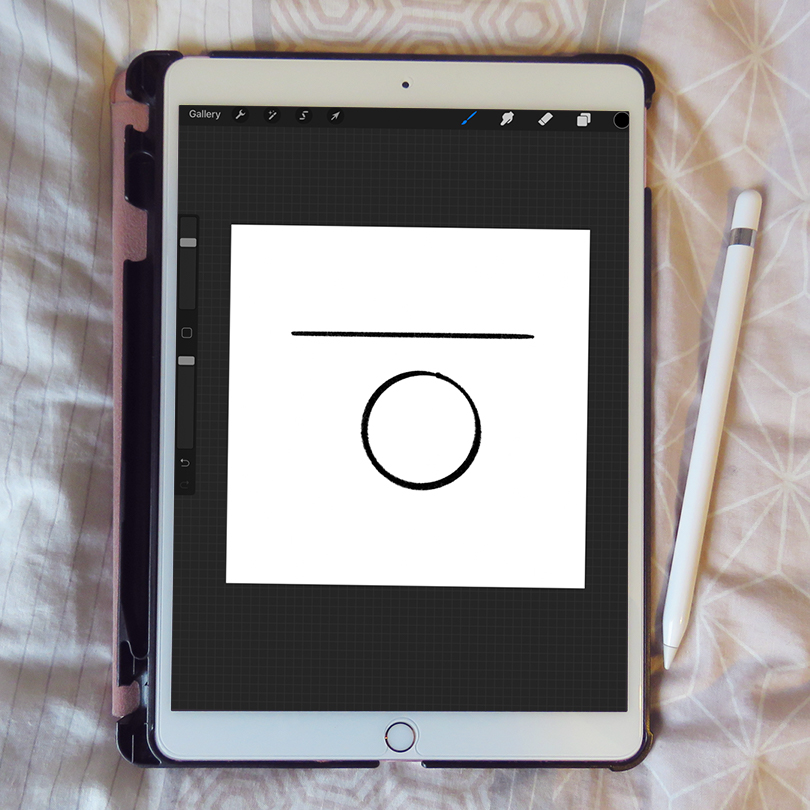
This is a super helpful tool that is not immediately obvious when you start using the app.
To draw a perfectly straight line in Procreate, simply draw a line (however wobbly), and when you reach the end, hold your Pencil there for a few seconds and the line will automatically become straight. You can then move your Pencil to change the length or angle of your line.
To draw a perfectly round circle in Procreate, draw a wobbly circle and again hold your Pencil at the end for a few seconds, and it will automatically link up and create a circle that is even all the way round.
At the top, you will then see an “Edit shape” button appear, where you can choose to make a perfect circle, ellipse, quadrilateral, rectangle or polyline. This tool is great if you want to do some drawing that is geometric.
Use a Perspective Grid
In your “Actions” menu, under “Canvas”, you can add a drawing guide to your canvas. These are lines that will not appear in your final image, but will help you create drawings that are perfectly measured or centered.
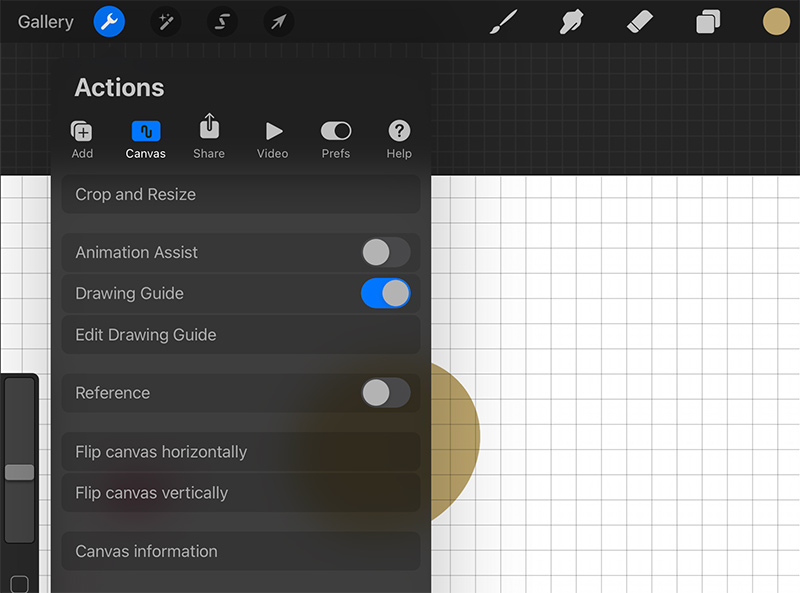
After adding the guide, click “Edit drawing guide” to change the shape, opacity, colour, thickness or style of your grid – you can even make a grid that is isometric, or use the perspective setting to create accurate three-dimensional artwork.
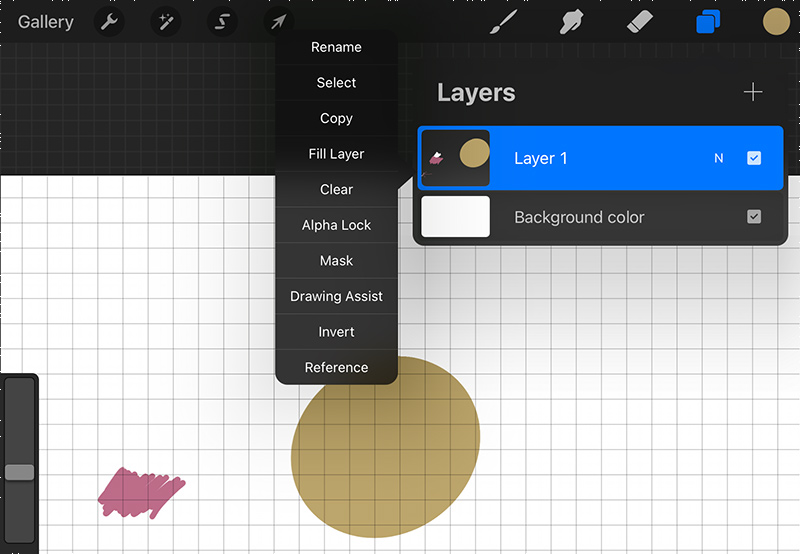
Using Layer Styles and Clipping Masks
In your layers panel, you can edit the opacity and style of your layer by clicking the little “N” on the right-hand side. This
“N” stands for “Normal”, which is the standard layer style, but you can also use a huge range of styles that will have a different impact on your artwork.
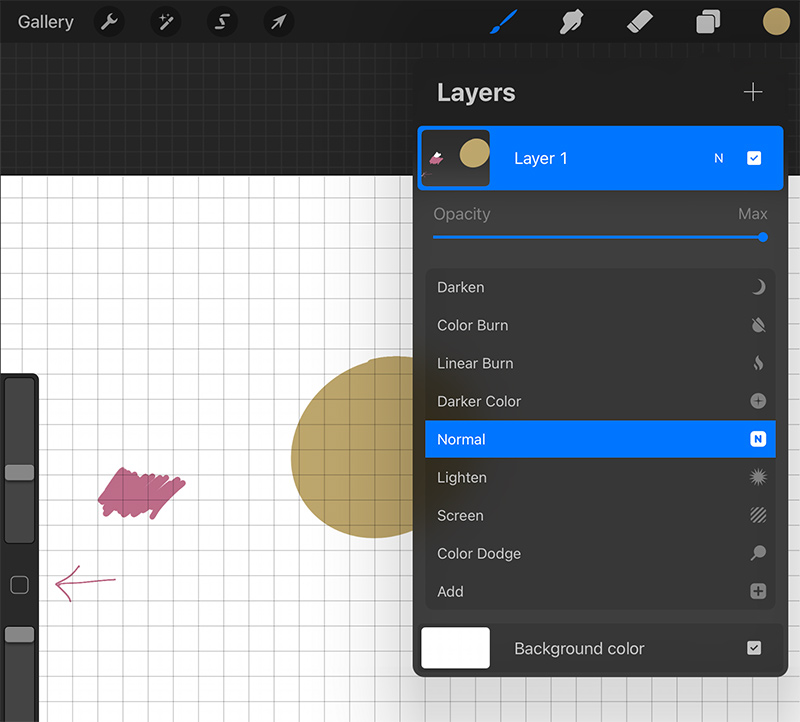
For example, “multiply” will make the layer darker and slightly transparent, while “screen” will make it lighter.
There are lots of settings here so take some time to experiment and research what each one does and how you might be able to use it.
When you make a new layer, you can tap it to open the layer settings. This is where you can name, duplicate or clear your layer, or merge it with a layer below.
Within this menu, you’ll see the options “Mask” and “Clipping mask”, which can be helpful for drawing. These options will allow you to add details or shading, but only over a certain area.
Clipping mask is a common tool to use for shading, because you can add as many clipping masks as you want without editing the layer below.
Experiment with default Procreate Brushes
Once you’ve understood the basics of Procreate, you can have a go at experimenting with different brushes.
Procreate comes with a number of fantastic brushes already downloaded, but you can also buy brushes from other artists on places like Gumroad and Etsy.
These brushes can replicate everything from a fun and funky pattern, to impressively realistic watercolour paint. Take some time to look at what’s available and see how you might use the brushes in your artwork.
Over time, you will probably find favourite brushes that you come back to time and time again.
You can also use brushes to smudge or erase your artwork. When you have smudge selected (the icon to the right of your brush), you can use your brush shape, texture, size and opacity to blend the colours of your drawing.
Lots of artists use this for shading. Your eraser works in the same way, using your brush to erase layers.
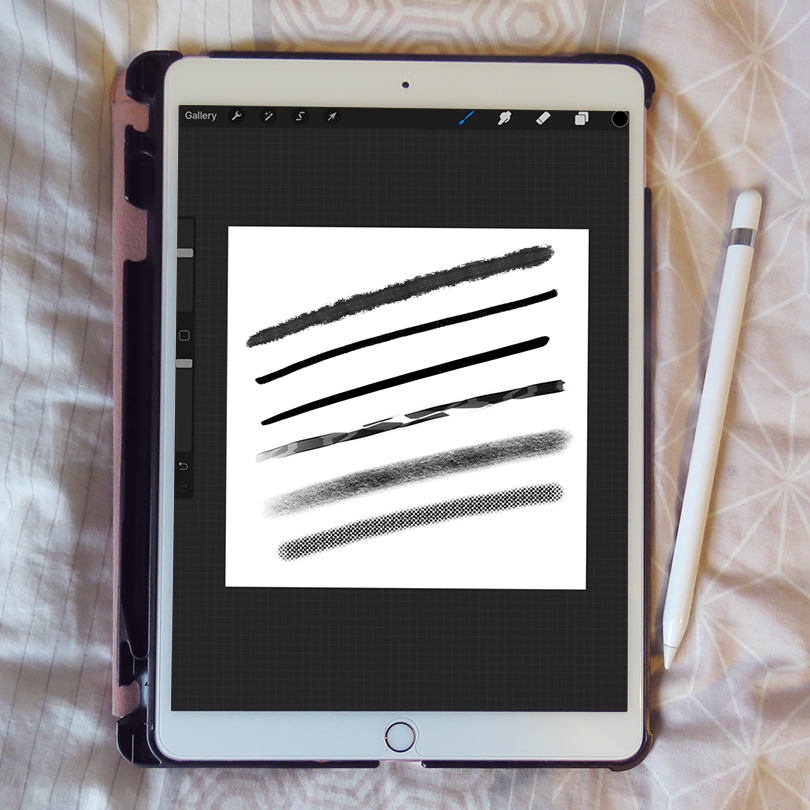
You can edit brushes even further by clicking on the brush in your brush library.
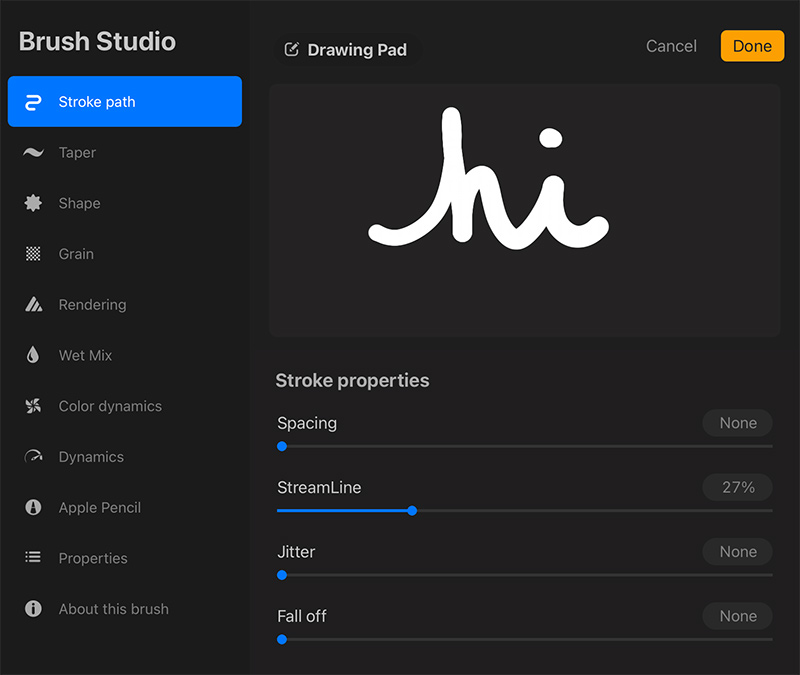
Here you can edit absolutely every aspect of the brush, from simple concepts like the spacing and size, to the way colours wet mix together.
This is also where you can play around with a setting called “Streamline”, which will subtly neaten the curves of your lines so they are less jittery and uneven.
This may be a helpful setting while you are still getting used to drawing with Procreate, or if you are creating detailed line work.
When you start to understand the brush settings, you can even use them to create your own brushes that are perfectly catered to what you want!
Experiment With Fonts
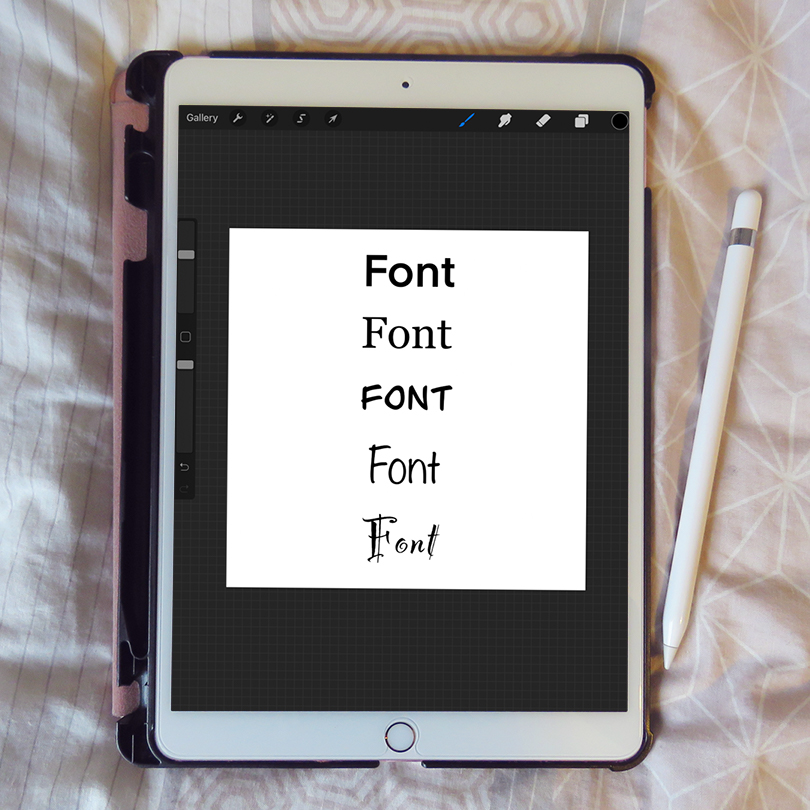
Under your “Actions” menu, you can click “Add text” to your canvas. Through this feature, you can edit the font of your text, as well as the size, and more detailed font options like kerning and tracking.
It’s a good idea to take some time to experiment with the font options in Procreate, as you can do so much with these settings.
You can also import your own fonts to make your artwork even more unique!
Exporting Procreate Artwork
Made a beautiful drawing you’re really proud of? Now you need to export it as an image file. Open the Actions menu and click “Share”.
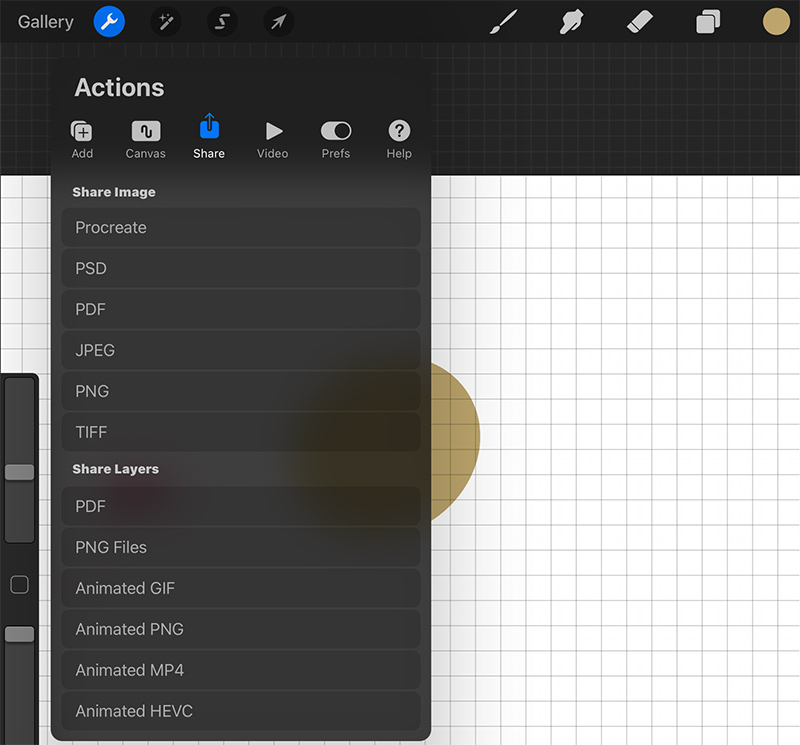
Here you can export your image in a number of different settings, but the most commonly used image settings are JPEG and PNG.
You could also export as a PSD file if you wanted to import your image into Photoshop.
To export a time-lapse process video of your drawing, click “Video”. You can press “Time-lapse replay” to watch the whole replay of the making of your drawing, and press “Export time-lapse video” to export the video as a full length or 30-second video.
This is also where you can turn the time-lapse recording off if you’re not a fan of this setting.
Try Animation in Procreate
Procreate recently added animation tools to the app, revealing a whole new world of creative options.
Although it is not a fully professional tool for animation, you can create some really polished and beautiful work, and definitely learn some animation basics like ball bounces and walk cycles.
You can find a detailed tutorial for using the animation features on Procreate’s website.
Utilize your QuickMenu
Under “Actions”, under “Preferences” and in “Gesture controls”, you can add a gesture to activate QuickMenu.
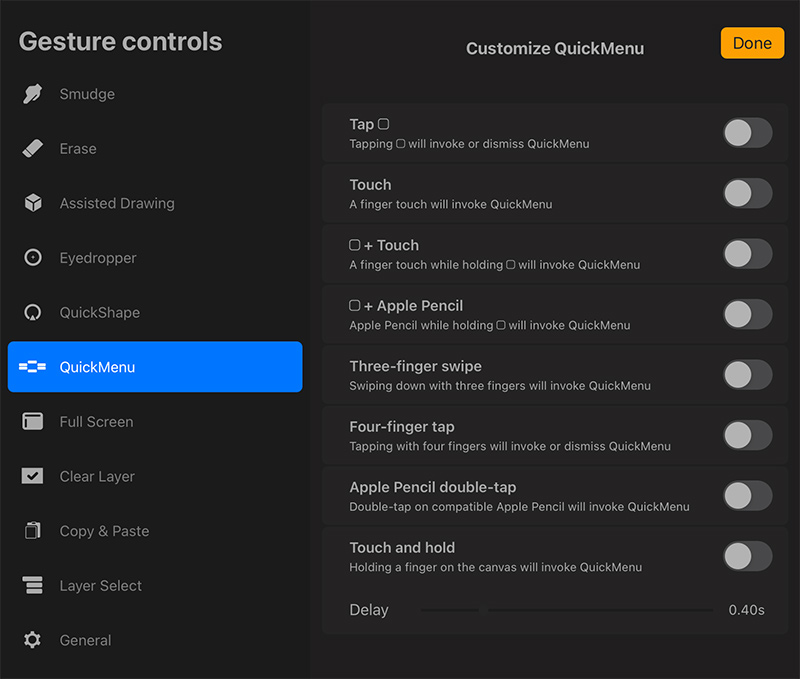
This menu can be activated on your canvas while you’re drawing to quickly access some common settings, which will help you speed up the process of drawing and using Procreate.
You can personalize your QuickMenu with settings you use most often.
Practice Makes Perfect
You won’t learn how to use Procreate overnight, especially if you’ve never used a digital drawing program before. But as you spend more time experimenting and using the app, you’ll find you become more comfortable with the menus and options, and can confidently navigate the space and make beautiful drawings.
When it comes to drawing in general, continuing to practice and draw from life will always improve your skills.
Don’t put too much pressure on yourself to be perfect straight away, but stay confident that you’ll get to the point where you can make artwork that you’re really proud of using just your iPad, Pencil and Procreate.
Procreate has helped to make digital art more affordable and accessible for everyone, though it can take some time to learn about the numerous menus and settings available within the app.
There is so much you can do in Procreate, so this article really just skims the surface of what’s on offer.
I hope it has given you the introduction you need to feel confident using Procreate to create beautiful digital drawings.
Last Updated on
Great article helpful to newbies such as myself question is there a way to move the small tool bar from left to right?